How to Make Beef Brisket Jerky
How to Make Beef Jerky

As a young girl, I desperately wanted to live in a sod house on the prairie and have my own little cow to milk. Laura Ingalls Wilder's Little House series impacted me deeply, and while today my house is made of wood (thankfully) rather than sod, I can at least happily collect eggs from our chickens. The story of Laura's childhood helped shape how I think about food. Visions of maple candy, green pumpkin pie and Ma's vanity cakes fascinated me, as did the process of actually making food. Theirs was truly local, unprocessed food; they grew, hunted and traded for each ingredient.
Although I eat a vegetarian diet more often than not, beef jerky is something that deeply appeals to me and satisfies my inner pioneer. Making beef jerky brings Pa Ingalls and his smokehouse right into my kitchen. It connects me to a time-honored process of preserving food which is deeply rewarding and evokes simpler times.
While I don't want to return to pioneer life, I do try to incorporate some of those values into my modern-day cooking. October Unprocessed inspires me to think about every ingredient I cook with and to ask myself if it can be made in my (or Ma's) home kitchen. Even though I make much from scratch, it's eye-opening to realize that not all of the ingredients I use always qualify. I'm enjoying using whole ingredients and the process of "unprocessing" and the push to stretch and grow in my tiny kitchen (I'm sure Ma pulled out drawers on which to balance cutting boards, too).
When my husband first mentioned homemade beef jerky years ago, it didn't take much research to realize it was something I could easily do. With each batch I made, I tweaked the marinade a bit or learned something new, such as freezing the brisket for a short time makes thin slicing with a knife much easier. I must say, it's been a fun experience! I first marinate the beef slices in a mix of maple syrup, soy sauce and Worcestershire sauce. Store bought Worcestershire lists high fructose corn syrup – definitely does not qualify as unprocessed – so I started making homemade Worcestershire sauce, as well.
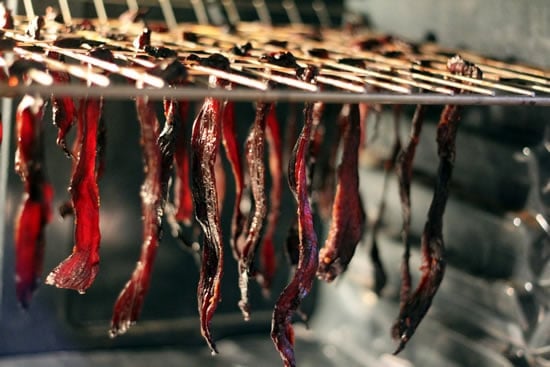
Lacking a smokehouse in the backyard, I instead use wooden toothpicks to suspend the strips of beef from an oven rack and a low oven temperature to dry it. The amount of time varies, depending upon how thin your slices are and how dry or chewy you prefer your jerky.
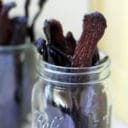
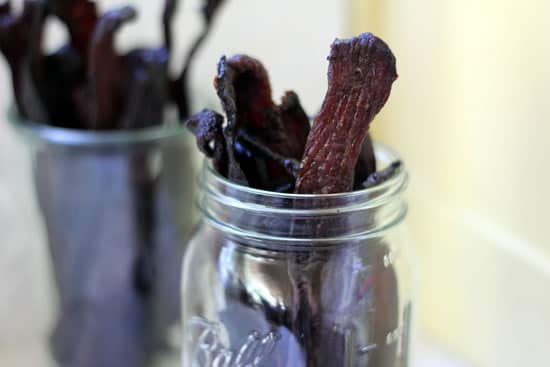
This is pure, unprocessed, delicious meat without any MSG, hidden ingredients or weird sounding additives (no packaging either). I have two teenagers who come home ravenous after school and a jar of beef jerky makes an ideal snack. As I watch my sons munching away, I think the Ingalls family would be proud!
Beef Jerky
If at any point there is a need for using up 3 pounds of beef, this should be your go to recipe.
Prep Time 1 day 1 hour
Cook Time 3 hours
Total Time 1 day 4 hours
Yield 14 servings
Calories 239 kcal
- 3 pounds organic pasture-raised beef brisket
- 1/2 cup Worcestershire sauce preferably homemade
- 1/2 cup organic unpasteurized soy sauce
- 3 tablespoons maple syrup
- 2 teaspoons freshly ground black pepper
- 2 large cloves garlic minced
- Wooden toothpicks
-
Pop the brisket in the freezer for about 30 - 45 minutes; this will make slicing it easier. Whisk together the Worcestershire sauce, soy sauce, maple syrup, black pepper and garlic and set aside.
-
Remove the brisket from the freezer. Slicing with the grain, slice the beef into strips as thin as possible (I try for 1/8-1/4 inch slices). Place all the beef slices in a ziploc bag and pour the marinade over. Seal the bag and squish and move the strips around to evenly coat the beef. Place the beef in the fridge and marinate for 24 hours.
-
Take both of your oven racks out of the oven. Set one rack aside and place the other over your kitchen sink. Line the bottom of the oven with foil (to catch drips) and preheat the oven to 200 degrees.
-
Drain the marinade from the bag. Take a beef strip and stick a wooden toothpick through it near the top (typically 1/4 inch from the top). The toothpick is used to suspend the beef strip as it hangs from the wires of the oven rack. Place the beef strip between two wires of the oven rack so the beef strip is suspended and hanging into the sink. Repeat with remaining strips. The beef strips can be hung close to one another, but should not touch one another. The entire batch should fill a standard oven rack.
-
Open the oven door and carefully slide your filled rack onto the top rung of the oven. Close the door and let the beef cook for 3 hours. At this point, begin checking/tasting the beef to see if it is to your liking. This will depend upon how thin your slices are and how chewy vs. dry you prefer your jerky. I usually let it cook for 3 - 3 1/2 hours, but have cooked it as long as 4 hours.
-
Remove the jerky from the oven and store in jars or other sealed containers. Store the jerky in the fridge or a cool area for easy snacking.
About the Author
Hannah Cordes lives in Seattle and the Methow Valley with her husband and two college-aged sons. She is the owner of a kitchen store named Aspen Grove. She was the chef at Hillel UW for six years and these days she can't resist a DIY project in her kitchen. Hannah prepares fresh, seasonal food for her family and friends and writes about it on her blog, Blue Kale Road. Her happiest place is around her family table crowded with guests. You can also find her on Facebook, Twitter and Pinterest.
Source: https://eatingrules.com/how-to-make-beef-jerky/
0 Response to "How to Make Beef Brisket Jerky"
Post a Comment